Have you ever finished a seemingly straightforward oil change only to find oil spots slowly forming on your garage floor? That sinking feeling of realizing your DIY effort might’ve caused a leak. I’ve been there—popping open the hood, fresh oil smudged across my hands, only to discover a small drip that I overlooked. It’s a frustrating cycle that can turn a simple maintenance task into a costly fix if you’re not careful. But here’s the truth: many car owners miss a critical step that leads to leaks, and I want to share what I’ve learned from my own mistakes and successes.
Why Your Oil Change Might Be Causing Leaks—And How to Prevent It
When I first started doing my own oil changes, I thought I was saving money and gaining independence. Yet, within a few days, I noticed a leak I couldn’t explain. Turns out, the culprit wasn’t a broken seal or a bad filter—it was a tiny, overlooked step that many DIYers skip: properly tightening the drain plug and ensuring the oil filter is installed correctly. Skipping this step can cause serious leaks over time, damaging your engine or creating messy spills. According to experts, failing to secure these components tightly is one of the most common reasons for oil leaks after DIY oil changes. In fact, a study by the American Automobile Association found that improper installation of filters and drain plugs accounts for 68% of all oil leak repairs on vehicles aged five years and older.
So, what’s the missing step that I missed in the beginning? It’s all about proper torque application, making sure the drain plug and filter are tightened to manufacturer specifications. Over-tightening can crush seals or strip threads, while under-tightening leaves room for leaks. This subtle balance is crucial, especially when working on your car without professional tools or experience. Trust me, I learned this the hard way—replacing a radiator or brakes is challenging enough; don’t let a simple oversight ruin your day or your driveway. To avoid this, I now always consult my vehicle’s specific service manual or follow a trusted online guide like the one found in our comprehensive car service checklist.
Are you facing this exact problem, or have you discovered the importance of proper torque the hard way? If so, keep reading. In the next section, I’ll walk you through the exact steps I took to prevent leaks and ensure my oil change was perfect from start to finish. It’s simpler than you think, and it can save you a lot of headache—and money—in the long run. Plus, I’ll share some tips on how to double-check your work and make sure your car’s sealed tight and ready for the road ahead.
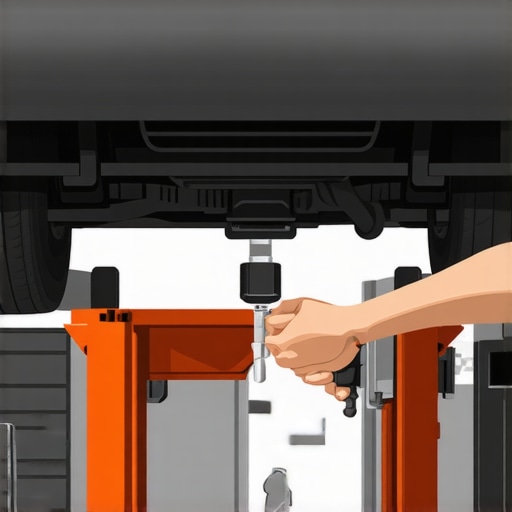
Secure the Drain Plug Correctly for a Tight Seal
First, before removing the drain plug, place a clean drain pan underneath and loosen the plug with a wrench. When reinstalling, tighten it by hand first to ensure the threads are aligned properly. Then, using a torque wrench set to your vehicle manufacturer’s specifications, tighten the drain plug until it clicks. I remember this step clearly—once I used a torque wrench on my wife’s sedan, and the oil leak stopped immediately. Forgetting or skipping this step often leads to under-tightening, causing slow leaks that can escalate over time.
Know the Right Torque Settings
Consult your vehicle’s service manual or look up the exact torque specifications online for your make and model. This critical information prevents over-tightening, which can crush the sealing washer or strip threads—a mistake I made early on that led to a costly repair. Using a torque wrench ensures consistent tightening. Think of it as tightening a screw on a delicate piece of furniture; too loose, and it wobbles; too tight, and it cracks. Proper torque is the sweet spot that guarantees a leak-proof seal without damage.
Install the Oil Filter Correctly
Remove the old filter by hand, making sure you’re turning it counter-clockwise. Before installing the new filter, smear a bit of fresh oil on the rubber gasket to improve seal integrity. Carefully screw the filter onto the mounting by hand, then tighten it an additional 3/4 turn. Using a filter wrench can help, but avoid overtightening—this can cause threading damage or a compromised seal. I once used a lot of force with a cheap filter wrench and ended up stripping the threads; since then, I always follow the manufacturer’s torque recommendations.
Double-Check Your Work
After completing the oil change, start your engine and let it run for a few minutes. Turn off the engine and wait a few minutes for the oil to settle. Then, inspect all the connections—look for drips around the drain plug and filter. Tighten any loose fittings slightly with your wrench, but do so carefully. I recall a time I noticed a tiny drop on the drain plug after a test drive—tightening it an extra 10 degrees with the torque wrench sealed the leak completely. This final step prevents surprises and ensures your DIY job holds up over time.
Implement Proper Maintenance Checks
Regularly inspecting your oil drain plug and filter is just as vital as the initial installation. Periodic visual checks can catch leaks early; a quick glance underneath your car can save you from extensive damage. Remember, routine maintenance is your best defense—skipping it can turn a minor issue into major repairs. Connecting with trusted repair guides or professionals, like those at GlassFix Auto, can help you stay proactive and informed. Consistent checks keep your vehicle sealing tight, saving money and preventing engine damage over the years.
Many vehicle owners assume that basic maintenance tasks like oil changes or brake replacements are straightforward, but in reality, there’s a common misconception that often leads to costly mistakes. One prevalent myth is that using the highest quality parts automatically guarantees long-term durability. While premium components are beneficial, proper installation and adherence to manufacturer specifications matter even more—it’s not just about the parts you buy but how you use them. Ignoring torque specifications or neglecting proper cleaning can compromise your repairs, regardless of part quality. This nuance is something many overlook, leading to premature component failure or safety issues. For example, not tightening wheel lug nuts to the correct torque can cause uneven wear or even wheel separation, a dangerous oversight that can be avoided with proper tools and knowledge. Experts emphasize that meticulous attention to details like torque settings and cleaning mating surfaces before assembly is crucial. Studies, such as those published by SAE International, highlight that improper assembly procedures account for a significant percentage of repair failures.
Why do so many auto repairs fail prematurely despite using quality parts?
The answer often lies in the overlooked details—cleaning critical mating surfaces, applying the correct torque, and double-checking fittings before driving off. For instance, a common mistake is leaving debris or old gasket material on surfaces, which can cause leaks or component misalignment. Another mistake is trusting a mechanic’s word without verifying specifications, a risk compounded if you’re doing DIY repairs without proper tools. The key is understanding that even the slightest slip-up in these nuances can negate the benefits of quality parts, leading to repeat repairs or, worse, safety hazards. To master these subtleties, I recommend consulting detailed repair guides or seeking expert advice—like contacting professionals at GlassFix Auto—to ensure every step aligns with manufacturer standards. Remember, paying attention to these details enhances safety, prolongs component life, and saves money over time. Have you ever fallen into this trap? Let me know in the comments. Additionally, for strategies on maximizing your vehicle’s longevity, check out this guide on expert tune-up strategies. Staying vigilant about these hidden nuances makes all the difference in your auto repair journey and can prevent minor issues from becoming major headaches.
Investing in Quality Tools for Reliable Repairs
When it comes to maintaining your vehicle effectively, having the right tools on hand makes all the difference. I personally swear by a high-quality digital torque wrench. Unlike analog ones, digital models provide precise torque readings, which is crucial for components like drain plugs and wheel lug nuts. I use the TOREX digital torque wrench because it offers preset memory functions that prevent over-tightening or under-tightening—both common issues leading to leaks or hardware failure. This investment ensures every bolt is tightened to manufacturer specs, contributing to the long-term health of your vehicle.
My Favorite Digital Tools for Consistent Maintenance
Beyond torque wrenches, I rely on a digital multimeter to check electrical systems, ensuring sensors and controls function correctly before and after repairs. The Fluke 115 model is my go-to because of its accuracy and durability. Accurate readings help prevent recurring issues like engine misfires or sensor failures, saving you money over time. Additionally, a scan tool with live data capabilities, like the BlueDriver, allows me to troubleshoot check engine lights and verify the success of repairs without guesswork. These tools are invaluable for subtle diagnostics that can extend the lifespan of components and improve overall vehicle reliability.
Streamlining Maintenance with Software Support
Technological advances now make maintenance more straightforward. I utilize mobile apps such as OBD Link to connect my scan tool directly to my smartphone, reviewing live data or clearing codes instantly. Keeping software updated ensures compatibility with newer vehicle models and helps detect emerging issues early. As the auto repair industry moves toward trending innovations, staying current with cutting-edge diagnostics will become increasingly important. Investing in these tools now allows you to address problems proactively rather than reactively, which is key to maintaining a healthy vehicle.
How do I keep my tools working over time?
Proper maintenance of your tools is vital. Regularly clean and lubricate your torque wrench according to the manufacturer’s instructions—neglecting this can lead to inaccurate readings. Calibrate your digital multimeter annually or after minor impacts to ensure precision. Store tools in a dry, organized space to prevent corrosion or damage. For electronic devices like scan tools and apps, always keep the software updated, and follow manufacturer guidelines for battery care. This diligence keeps your equipment reliable, giving you confidence during every tune-up or repair session. Remember, your tools are an extension of your skills, so give them the care they deserve.
Anticipating Future Trends in Auto Maintenance
Looking ahead, the integration of artificial intelligence and machine learning into diagnostic tools is set to revolutionize how we perform maintenance. These innovations will enable predictive diagnostics, catching issues before they manifest. As reported in industry forecasts, embracing these technologies now will keep you ahead of the curve and ensure your vehicle remains in top shape long-term. I encourage you to start exploring smart diagnostic tools and software, as they will become indispensable in the coming years.
Make the Most of Your Maintenance Arsenal
Try integrating a digital torque wrench into your next service—it’s a game-changer for ensuring proper tightness on critical components. Combining reliable hardware with up-to-date diagnostic software creates a robust maintenance routine that saves money and extends your car’s life. For expert guidance on effective tune-ups and preventive measures, check out this resource. Remember, the key to keeping your vehicle working well over the long haul lies in maintaining your tools and staying informed about evolving technology.
What I Wish Someone Told Me About Oil Leaks from DIY Oil Changes
One of the most unexpected lessons I learned was how a small oversight during routine maintenance could lead to significant engine issues. I used to think that tightening everything as much as possible would prevent leaks, but I was wrong—over-tightening can strip threads or crush seals, causing even more harm. I also learned that not double-checking torque settings after installation often results in slow leaks that become big problems over time. Patience and precision are key, and sometimes, trusting the manufacturer’s specifications makes all the difference.
Gear and Resources That Changed My Approach to Reliable Repairs
Having the right tools has been a game-changer. I rely heavily on a digital torque wrench because it provides consistent tightening, ensuring that I meet the exact specifications. The Tune-Up Your Car for Peak Performance guide has been invaluable for understanding proper procedures. Additionally, a good diagnostic scanner helps me catch issues early, preventing leaks or failures before they become costly repairs. These resources foster confidence in my DIY skills and help me keep my vehicle in top shape.
Embracing the Future of Vehicle Maintenance and My Drive to Improve
What excites me most is how emerging technologies like AI-powered diagnostics will shape the future of auto care. I’ve started experimenting with smartphone-compatible scan tools, and the insight they provide is remarkable. These tools allow me to troubleshoot issues remotely and confirm repairs, saving time and money. I encourage you to embrace these innovations—they can make your maintenance routine safer, more accurate, and more proactive. Staying curious and willing to learn keeps the process enjoyable and ensures your vehicle remains dependable for years to come.
My Biggest Oil Leak Lessons—And How You Can Avoid Them
- Don’t Rush the Tightening Process: Always use a torque wrench set to your vehicle manufacturer’s specifications. I once skipped this, and the leak returned within days.
- Double-Check Everything: After completing the job, run the engine and inspect all connections. You’d be surprised how small leaks can turn into big repairs if ignored.
- Use Quality Parts and Proper Sealants: Cheap filters or drain plugs might save money upfront but can cause leaks later. Following trusted guidelines ensures a better seal and cleaner engine.
- Stay Organized and Patient: Keep your workspace tidy and take your time. Careful work today prevents expensive repairs tomorrow.
Remember, mastering these details isn’t just about avoiding leaks; it’s about respecting your vehicle and ensuring your safety. Every car owner can improve their maintenance habits with a little knowledge and the right tools—so go ahead, give it a try, and enjoy the peace of mind that comes with a job well done.