I’ll never forget the day I nearly missed noticing a dangerous brake issue on my trusty old ride. One morning, during a quick commute, I felt that unsettling softness in my brake pedal. It wasn’t fully sinking, but there was enough of a sensation that I knew something wasn’t right. My first instinct? Panic. My second? Frustration — because I knew I should have caught this earlier, but I hadn’t really inspected my rotors in ages. That moment became my lightbulb moment: brake maintenance isn’t just for seasoned mechanics. Now, in 2026, with auto technology advancing rapidly, mastering simple rotor inspections can save you time, money, and, most importantly, safety. Today, I want to share three tried-and-true hacks I’ve personally developed for DIY rotor checks, bypassing the need for immediate shop visits.
Why DIY Rotor Inspection Matters More Than Ever
Think about it — your brakes are your vehicle’s most critical safety component. Yet, many avoid inspecting rotors until they notice squealing, pulsing, or outright brake failure. Falling into that reactive cycle can lead to costly repairs or dangerous road trips. According to the National Highway Traffic Safety Administration, brake problems contribute to over 20% of crashes where brake failure was a factor. That’s why staying proactive with simple DIY checks is a game-changer. The good news? You don’t need to be a professional to spot early warning signs, and with just a few hacks, you can keep your braking system in top shape.
Is It Really Worth the Effort to Check Your Rotors Yourself?
Early in my DIY journey, I made the mistake of trusting a mechanic to handle everything without understanding what was going on. I paid extra for repairs that could have been avoided had I done a basic inspection myself. The truth is, with the right approach, inspecting your rotors isn’t just cost-effective — it’s empowering. Plus, you’ll gain confidence in understanding your car’s health, knowing when to seek professional help, and perhaps even spotting issues before they become emergencies. Curious how I started? I’ll walk you through the first steps so you can avoid my initial slip-up and get on the road with peace of mind. Ready to learn these simple, effective hacks? Let’s dive in and take control of your vehicle’s safety today.
Start with a Visual Inspection of Your Rotors
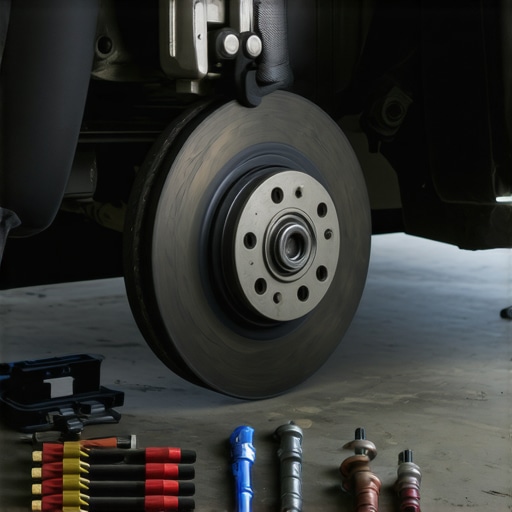
Park your vehicle on a flat surface, set the parking brake, and turn off the engine. Remove the wheel to access the rotor area. Look for obvious signs of uneven wear, deep grooves, or cracks. During my first attempt, I noticed a slight lip on the rotor’s edge—a red flag indicating uneven wear—so I decided to investigate further. Regular visual checks like this can catch issues early, preventing costly repairs later.
Use Your Finger or a Rubber Mallet to Detect Warping
Run your fingertip or a rubber mallet gently across the rotor surface. A smooth surface indicates no warping; a rough or uneven feel suggests it might be warped. I once felt a slight vibration when braking, which led me to discover a warped rotor after performing this quick test. This tactile method helps identify subtle problems without fancy tools.
Check Rotor Thickness and Measure Deviation
The thickness of your rotor is critical. Use a digital caliper or a micrometer (available at hardware stores) to measure the rotor’s thickness at multiple points. Compare these to your vehicle’s specifications, often found in the owner’s manual or online. When I measured mine, I found that the thickness was below the minimum limit, signaling that replacement was due. Maintaining correct thickness ensures effective braking and prolongs rotor life.
Assess the Rotor Surface for Uniformity and Shine
Inspect the rotor surface for consistent coloration and smoothness. A shiny, uniform surface indicates even wear. Conversely, rusty patches or dark grooves reveal uneven wear patterns. I remember cleaning a rotor that had developed rust spots; after a light sanding, the surface was more even, and braking improved noticeably. This simple visual cue guides maintenance decisions.
Perform a Brake Pedal Feel Test
With the engine off, press the brake pedal multiple times. A spongy or soft pedal can indicate air in the brake lines or a need for fluid replacement, which can be related to rotor issues. During one DIY session, I noticed the pedal felt softer than usual, prompting me to bleed the brakes. This test connects the physical response of your brakes to rotor condition, helping diagnose related issues.
Check for Vibrations or Pulsing While Braking
Drive slowly and brake gradually. If you feel pulsing or vibrations in the steering wheel or seat, the rotors might be warped. I experienced this firsthand during a routine drive; the pulsing prompted me to consider resurfacing or replacing the rotors. Recognizing these signs early can save you from sudden brake failure and costly emergency repairs.
When to Seek Professional Help
If you notice any of these signs—deep grooves, significant warping, thickness below spec, or persistent vibrations—it’s time to consult a professional. While DIY checks are valuable, some issues require precise machining or replacement. For expert guidance, see how auto repair strategies can boost your vehicle’s safety by reading more about reliable brake service techniques.
Many car owners operate under misconceptions about vehicle maintenance, especially regarding brake service and tune-ups. One common myth is that if a car runs smoothly, it doesn’t need immediate attention, but this belief overlooks subtle signs of wear that can lead to costly repairs if ignored. For example, assuming that brake squealing is always harmless can be dangerous; in fact, persistent noise often indicates warped rotors or worn pads that require prompt attention. Relying solely on visual cues without understanding their underlying causes is another mistake; a shiny rotor surface might seem fine visually, but without measuring thickness or checking for warping, you could miss impending failure. Advanced drivers know that noise, vibration, or inconsistent pedal feel are symptoms of deeper issues needing specialized diagnosis, like latent rotor warping or caliper problems that aren’t visible to the naked eye.
Why do so many overlook the nuances of brake system health?
The truth is, many believe that only major failures warrant professional help, but preventative habits, such as detailed inspections and understanding the mechanics behind brake behavior, drastically improve safety and longevity. Experts emphasize that regular, targeted check-ups can uncover hidden issues before they escalate—think of it as a form of auto health insurance. For instance, a small lip on the rotor surface might suggest uneven wear that, if addressed early, can prevent unsafe vibrations and longer-term damage. Remember, bolt-on problems often reveal themselves through symptoms like pulsing brake pedals or strange noises—dedicated attention to these signs saves money and enhances safety. Furthermore, advanced maintenance techniques, like measuring rotor thickness accurately or detecting subtle warping, are crucial skills that even experienced DIY enthusiasts should master. Missing these nuances is a classic trap, often leading to unnecessary replacements or, worse, brake failures on the road. To delve deeper into professional strategies that can enhance your vehicle’s safety, consider reviewing pro tune-up habits and learn how expert insights can make a tangible difference. Remember, knowledge is power, especially when it comes to auto safety. Have you ever fallen into this trap? Let me know in the comments.
Tools You Can Trust for Longevity and Precision
Keeping your vehicle performing optimally requires more than just know-how—it demands the right equipment. I personally swear by a few specific tools that have made my DIY maintenance both safer and more effective. For starters, a digital caliper is indispensable for measuring rotor thickness accurately. Unlike traditional micrometers, a digital caliper offers quick readings, reducing measurement errors, and is relatively affordable. I rely on the reliable calipers I found online, which have held up through countless inspections.
Next, a rubber mallet helps detect rotor warping without risking damage. Its gentle tap can reveal uneven surfaces that might be missed by visual inspection alone. I’ve found this method invaluable in identifying subtle issues before they escalate.
For cleaning and assessing rotor surfaces, I use a abrasive pad or brake cleaner. A good-quality brake cleaner effectively removes rust and debris, ensuring accurate measurements and assessments. My go-to is a spray that dries quickly and is rated as environmentally safe.
Additionally, I recommend investing in a set of ratchet wrenches and torque wrenches. Proper torque application is critical, especially when dealing with lug nuts and caliper bolts. Using a torque wrench prevents over-tightening, which can warp rotors or damage threads. I often check out professional torque tools that maintain calibration over years of use.
Finally, software tools are a rising trend in auto maintenance, especially for those interested in diagnostics. I recommend a quality OBD-II scanner—these devices connect to your smartphone and can read error codes, sensor data, and sometimes even suggest fixes. For example, I use the recommended OBD-II scanners to stay ahead of potential issues. Embracing these tools can save significant money and time, especially when paired with proper maintenance routines.
Where do I keep my tools for maximum efficiency?
Stored in a sturdy, organized toolbox with labeled compartments, my tools are always within arm’s reach. This setup minimizes downtime during repairs and keeps everything in pristine condition. Investing in a durable toolbox and regularly cleaning and calibrating your tools ensures long-term accuracy and reliability. As technology advances, tools like digital torque wrenches and diagnostic apps are becoming indispensable for DIY enthusiasts and professionals alike. They not only improve precision but also give you insight into your vehicle’s health, an essential step in the journey to reliable, long-lasting auto maintenance. In fact, staying up-to-date with the latest tools and techniques can be a game-changer, leading to better results and increased safety on the road. Want to up your game? Try integrating a top-rated OBD-II scanner this month and see how it helps you catch issues early. To explore more about trustworthy maintenance practices, check out tips for reliable vehicle tune-ups.
What’s next for car maintenance tools
Predicting the future, I believe the trend toward integrated diagnostic tools and AI-powered repair guides will soar. As these become more accessible, DIY enthusiasts will gain professional-level insights that simplify complex diagnostics. Anticipate IoT-enabled devices that monitor vehicle health in real-time, alerting you to issues before they become emergencies. Embracing these advancements will make vehicle maintenance more accessible, affordable, and accurate—empowering everyone to keep their cars working longer and safer. So, gear up with the right tools—your vehicle and safety depend on it.
The Hardest Lessons I Learned About car service,brake service,auto repair,tune up
One striking revelation was realizing how minor signs—like a subtle pedal softness or a faint squeal—could foreshadow major issues. Ignoring these early cues often led me down costly repair paths, but now I know that attentive, DIY inspections can catch problems long before they escalate, saving both money and safety. Embracing proactive checks transformed my approach, emphasizing that understanding my vehicle’s nuances is more empowering than waiting for a breakdown.
My Essential Toolkit for Auto Maintenance Success
From a trusty digital caliper to a reliable OBD-II scanner, I’ve found tools that make accurate inspections achievable for anyone. These devices help me measure rotor thickness precisely and diagnose hidden issues early. Investing in quality tools has paid dividends in confidence and precision, proving that the right equipment can elevate your DIY game from guesswork to expert-level maintenance.
Don’t Wait for the Warning Lights
The journey into DIY brake care has taught me that acting sooner, rather than later, is the secret to safety. Vibration during braking or a soft pedal isn’t just an annoyance—it’s a warning sign. Addressing these signals early, with some basic inspections and tools, means I can avoid emergency repairs and ensure every stop is secure. It’s a habit that truly puts me in control of my car’s health and my safety on the road.
Reading this post really resonated with me, especially the part about how subtle signs like pedal softness or vibrations can indicate bigger issues before they turn into emergencies. I remember once ignoring a slight squeal during braking, thinking it was just dust, only to find out later that my rotors were warped, which almost led to a dangerous situation. It’s impressive how simple visual and tactile checks, like using a rubber mallet or measuring rotor thickness, can save a lot of money and keep safety on point. I’ve recently started incorporating these DIY inspections into my routine, and it’s boosted my confidence in vehicle maintenance. Does anyone have recommendations for affordable tools that are reliable for these checks? I’m also curious how others prioritize these checks, especially when balancing time with maintenance needs. For me, setting a monthly inspection schedule has worked well, but I’d love to hear different approaches from the community.