
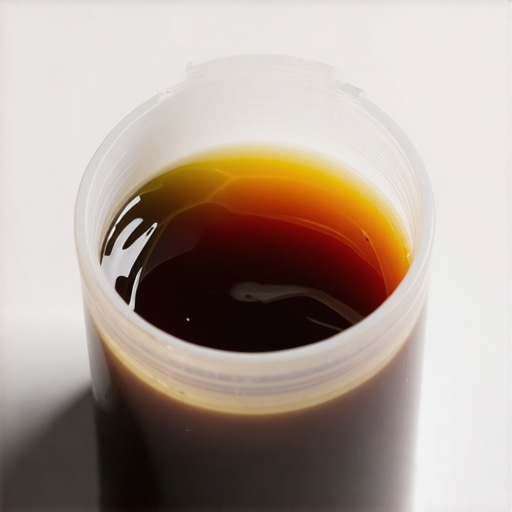
It was a chilly Saturday morning when I finally decided to give my car some needed attention. As I popped open the hood, my eyes caught something unusual — the brake fluid reservoir. Instead of the clear or amber hue I expected, the fluid looked just like a cup of dark coffee. That lightbulb moment hit me hard. I had never paid much attention to the color of my brake fluid before, but that day, I realized how crucial it really is.
If you’ve ever faced a similar situation, you know how unsettling it can be. The thought that your vehicle’s vital brake system could be compromised by something as simple as dirty, discolored fluid is enough to make anyone nervous. Today, I want to share my experience and help you understand why your brake fluid might turn coffee-colored, what it actually means, and, most importantly, what you should do about it.
The Hidden Dangers of Coffee-Colored Brake Fluid
Is This Normal or a Sign of Trouble?
Many car owners overlook the importance of brake fluid, assuming it changes little over time. But in reality, brake fluid is a highly hygroscopic substance — meaning it absorbs moisture from the air. Over time, this moisture causes the fluid to degrade, leading to a darkening color, lumpy residue, or even a burnt smell. When your brake fluid looks like coffee, it’s a clear warning sign that the fluid is contaminated and no longer performing optimally.
I made the mistake early on of ignoring a slightly dark fluid, thinking it was just a normal aging process. That was a costly error that compromised my braking performance during a sudden stop. I learned the hard way that maintaining fresh brake fluid is essential for safe handling and avoiding costly repairs. If you’re curious, you can read more about the importance of regular brake maintenance on **[Glass Fix Auto’s comprehensive auto repair guides](https://glassfixauto.com/understanding-brake-system-repairs-a-guide-for-vehicle-owners)**.
Have you ever noticed your brake fluid turning darker or more opaque? It’s a small detail, but ignoring it can lead to bigger problems down the line. The good news is that this issue is fixable with a simple brake service, and I’ll walk you through the steps shortly. But first, let’s address a common concern many folks have—”Is this really worth the fuss?”.
Gather Your Tools and Prepare the Vehicle
First, ensure your vehicle is parked on a flat, level surface, and the engine is off. Apply the parking brake for added safety. You’ll need a wrench, a clear container, a syringe or turkey baster, fresh brake fluid recommended for your vehicle, and safety gloves. Wear gloves and eye protection since brake fluid is corrosive. Before starting, check your owner’s manual to verify the correct type and quantity of brake fluid. This preparation is like gathering ingredients before cooking — accuracy matters for a successful result.
Drain Old Brake Fluid from the Reservoir
Locate the brake fluid reservoir under the hood. Use a clean syringe or turkey baster to aspirate as much old fluid as possible from the reservoir. Carefully dispose of the contaminated fluid according to local regulations. This step prevents mixing dirty fluid with fresh fluid, similar to cleaning out a dirty cup before pouring new coffee, ensuring the system starts fresh.
Loosen and Remove Brake Bleeder Valves
Identify the brake calipers or wheel cylinders on each wheel. Attach a transparent tube to the bleed valve and place the other end into a container to catch old fluid. Loosen the bleeder screw slightly. Have an assistant press the brake pedal slowly—this pushes air and old fluid out through the tube. Think of this process like squeezing out old toothpaste from the tube — you clear the gunk before filling it with new paste. Be prepared to repeat this process at each wheel to ensure all air and contaminants are expelled.
Refill the Reservoir and Repeat Bleeding
Refill the reservoir with fresh brake fluid immediately to prevent it from running dry during bleeding. Have your helper repeatedly press the brake pedal while you open and close the bleed valves. This action pushes out old fluid and air bubbles, replacing them with fresh fluid. It’s reminiscent of flushing a dirty system with clean water — a crucial step to prevent air-locks or residual contaminants. Continue until the fluid emerging from the valves is clear and free of bubbles, ensuring optimal brake performance.
Final Checks and Top-Ups
After bleeding all four wheels, top off the reservoir with the recommended brake fluid to the max line. Pump the brake pedal a few times to ensure it firms up, indicating proper pressure. Visually inspect all bleeder screws and hoses for leaks. Performing these steps ensures your braking system is responsive and safe, much like tuning a guitar string to the perfect pitch — every detail contributes to harmony.
Test Drive and Confirm Brake Efficiency
Take a short drive in a safe area to test your brakes. Ensure the pedal feels firm and responsive, with no sponginess or unusual noises. This real-world check confirms that your work has paid off, similar to a chef tasting their dish before serving — you want to make sure everything is just right.
When it comes to vehicle maintenance and repair, many enthusiasts and everyday drivers are quick to accept common wisdom without digging into the details. But as an auto repair expert with years of hands-on experience, I can tell you that there are subtle misconceptions and pitfalls that frequently trip up even seasoned car owners. Understanding these nuances can save you money, improve your vehicle’s performance, and extend its lifespan.
One widespread myth is that a simple tune-up is just about replacing spark plugs and air filters. While these are part of the process, true expertise involves analyzing *why* certain components may be wearing out faster, often due to underlying issues like fuel system inefficiencies or sensor failures. For example, a misfiring engine might appear minor, but if left unchecked, it can cause catalytic converter damage—which is costly to replace. Checking diagnostic codes and understanding their nuances can help you diagnose these problems early. To dive deeper into effective maintenance strategies, visit this comprehensive guide on tuning for peak performance.
A common trap many fall into during brake service pertains to the perceived need for complete pad replacement every time. In reality, many brake pads are designed with wear indicators and can be resurfaced or cleaned, saving money and reducing waste. However, a sneaky mistake is oversimplifying rotor condition; rotors can often be machined, but they may also develop hidden cracks or uneven wear that isn’t immediately visible. Relying solely on surface inspection without measuring thickness or checking for cracks can lead to dangerous brake fade during an emergency stop. Make sure you understand the difference—read about brake system nuances in this article on auto repair trends.
In the realm of general car service, some believe that oil changes are only about replacing the oil. But seasoned mechanics know that oil analysis can reveal much about engine health. For instance, contaminated oil with metallic particles hints at internal wear, indicating that a more in-depth inspection of engine components is required. Skipping such diagnostics might lead you to overlook early signs of engine trouble, turning a minor issue into a major overhaul. Want to ensure your engine gets the attention it needs? Check out this guide on understanding brake and engine repairs.
But perhaps the most insidious misconception is about diagnostics: many assume that a quick code read is enough. In reality, diagnostic trouble codes (DTCs) are merely starting points. They can point you toward a system, but not the exact cause. For example, a P0171 code indicates a lean condition, but the root cause could be a vacuum leak, a faulty fuel pump, or a clogged air filter. Advanced troubleshooting requires understanding the context, checking related sensors, and ruling out common pitfalls—like atmospheric leaks or sensor corruption. This is where experience and in-depth knowledge make all the difference.
How often have you fallen into one of these traps? Recognizing the hidden nuances in auto repair allows you to move beyond surface-level fixes and truly understand your vehicle. Don’t take shortcuts with critical components—ask questions, do your research, and consult experts when unsure. Remember, regular vehicle checkups outlined in this essential checklist can help catch these nuances before they become costly problems. Stay curious, stay informed, and your car will thank you for it.Maintaining your vehicle over the years requires more than just routine oil changes; it demands the right tools, a strategic approach, and an understanding of how to adapt to your car’s evolving needs. As an auto repair veteran, I’ve found that having a curated set of professional-grade equipment not only makes repairs more efficient but also extends your car’s lifespan. For example, investing in a high-quality digital multimeter allows you to diagnose electrical issues quickly and accurately, saving time and preventing unnecessary part replacements.
Why I Trust Specific Tools for Long-Term Maintenance
From my experience, a reliable torque wrench is essential when working with suspension components or tightening lug nuts to precise specifications outlined in the manufacturer’s manual. I personally prefer a digital torque wrench with a backlit display and preset settings — it ensures consistency and prevents over-tightening, which can lead to premature wear or failure. Moreover, a good set of automotive-specific diagnostic software, like OBD-II scanners that connect via Bluetooth or USB, empowers you to read and clear trouble codes with ease, giving insight into underlying problems before they escalate.
The Future of Car Maintenance Tech
Technological advances point towards greater integration of AI-driven diagnostics and predictive maintenance tools. Apps that analyze vehicle data in real time will soon help drivers identify issues before symptoms appear, making maintenance more proactive than reactive. This trend is transforming the landscape, as highlighted in auto repair trend reports. I predict that adopting these intelligent systems now will give you an edge, ensuring your vehicle remains in top shape far longer than traditional methods alone.
How do I keep up with these evolving tools and ensure my vehicle remains reliable? The key is regular checks and embracing the latest technology. Upgrading your diagnostic scanner periodically, learning to interpret data from new sensors, and staying informed about industry innovations are crucial. For ongoing guidance, I recommend reviewing comprehensive resources like this ultimate car service guide which outlines best practices for sustained vehicle health. Finally, always test new tools or techniques on non-critical systems first and document your process — this habit helps you troubleshoot effectively and build confidence over time. If you’re ready to delve deeper, I suggest trying out a diagnostic tool that integrates AI analytics; it’s a game-changer for maintaining your car’s health in the long run.
Lessons That Changed My Approach to Car Maintenance
One unexpected realization was how often we overlook small details like brake fluid color, assuming it doesn’t matter. That coffee-colored fluid taught me to trust my intuition and investigate deeper rather than dismissing symptoms as normal aging. I’ve learned that taking the time to understand what each sign means helps prevent costly repairs down the line.
Another lesson was the importance of using the right tools. A quality bleeder kit and proper protective gear made the brake flushing process safer and more effective. Skimping on tools may save money in the short term but costs more when repairs become serious. Investing in reliable equipment turned routine maintenance into a manageable DIY task rather than a stressful unknown.
Finally, I discovered that regular maintenance isn’t just about responding to issues—it’s about being proactive. Scheduling routine brake fluid checks and flushes using a trusted comprehensive guide, like this checklist, creates a cycle of care that keeps my vehicle performing reliably. These insights have made me more confident in my auto care skills and more attentive to my car’s needs.
Tools and Resources That Elevated My Auto Repair Game
My go-to tool for brake system maintenance is a digital brake fluid tester, which gives quick, accurate readings of fluid condition—saving me from guesswork. I also rely on a high-quality OBD-II scanner from auto repair trend reports to troubleshoot underlying issues that might cause discoloration or performance problems. These tools have become indispensable in diagnosing and maintaining my vehicle efficiently.
For learning more about the big picture and staying ahead, I turn to trusted resources like this expert guide on tune-up strategies. It’s packed with insights that help me understand how brake fluid health links to overall vehicle longevity. Incorporating these resources boosts my confidence and saves trips to the mechanic for minor issues.
Lastly, I recommend joining online forums or local auto clubs where seasoned enthusiasts share real-world experiences and tips. Sometimes, a quick chat with someone who’s faced the same challenges can provide practical wisdom that no manual can match. Staying connected helps keep my skills sharp and my vehicle running smooth.
Embrace the Journey Toward Confident Auto Care
Taking charge of your vehicle’s maintenance, especially something as crucial as brake fluid health, can feel daunting at first. But with the right knowledge, tools, and mindset, you can transform into your own mechanic and ensure your car remains safe and reliable. Remember, every small step you take builds towards greater confidence and independence behind the wheel.
Are you ready to start applying these insights and take control of your auto maintenance routine? Share your experiences or ask questions below—your journey begins with that first, confident step.