
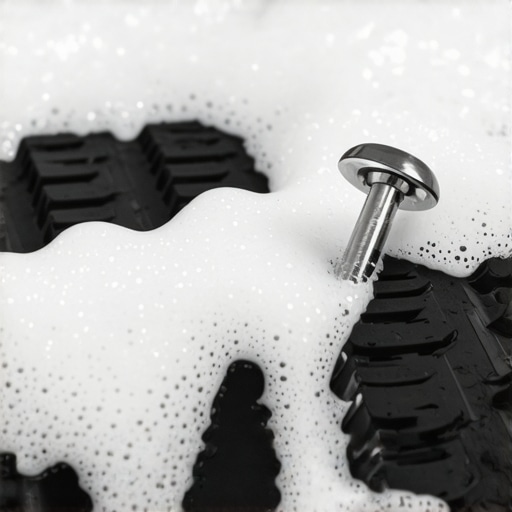
There I was, knee-deep in a Monday morning rush, and that dreaded orange exclamation point popped up on my dashboard. Again. I had just topped off the air in that passenger-side rear tire three days prior, hoping it was just a temperature drop playing tricks on the sensors. It wasn’t. I knew deep down there was a nail in there somewhere, but staring at a slab of black rubber is like searching for a needle in a haystack—only the haystack is moving, covered in road grime, and usually soaking wet. I spent twenty minutes squinting at the tread in the driveway like I was trying to solve one of those 90s Magic Eye posters, but I found absolutely nothing but frustration. [image_placeholder]
Stop Squinting and Start Spraying
I made a classic rookie mistake early on in my DIY journey: I assumed my eyes were enough. I once spent an entire Saturday afternoon rotating the tire an inch at a time, checking every groove with a dim flashlight, only to give up and wake up to a completely flat tire the next morning. That mistake didn’t just cost me time; it ruined the sidewall because I tried to ‘limp’ it to the gas station. If you have been rotating tires every 5000 miles, you probably have a better eye for your tread than most, but even a pro can miss a thin finishing nail tucked deep in a lug. The real secret isn’t better lighting; it is chemistry. Or, well, just some basic dish soap and water.
Is it actually worth trying to find it yourself?
You might think, ‘Why not just drop it at the shop?’ While the ultimate car service guide will tell you that professionals have all the tools, knowing troubleshooting common auto repair issues before visiting the shop saves you from the ‘undiagnosed’ fee. Plus, if you can find the leak in five minutes in your driveway, you can decide if it’s safe to drive on or if you need to swap to the spare. Driving on a slow leak is a gamble you usually lose. According to the National Highway Traffic Safety Administration (NHTSA), tire-related crashes result in hundreds of fatalities annually, and many of those stem from neglected punctures that eventually lead to catastrophic blowouts. Have you ever spent an hour circling your car like a hawk, only to give up and find the tire flat at the worst possible moment? It is a special kind of annoyance that we are going to fix today. Before you start, check the age of your rubber; if you read the date code on your tires and see they are over six years old, that nail might just be a sign from the universe that it is time for a fresh set anyway. Otherwise, grab a spray bottle, because we are about to make that hidden leak scream for attention.
Mix Your Leak Detection Potion
Forget the fancy sprays at the auto parts store. You need a spray bottle, some water, and a generous squirt of dish soap. You want the mixture to be sudsy enough to blow bubbles, like the ones you used as a kid. If it is too watery, the air will just push the liquid away without forming a visible dome. I once tried this with just a wet rag and missed a pinhole leak for three days because I was too cheap to use the soap. When I finally mixed a concentrated batch in a spray bottle, the leak revealed itself in ten seconds, growing a mushroom of bubbles right before my eyes.
This method is essential for troubleshooting common auto repair issues before visiting the shop. You are looking for a continuous, growing cluster of white foam. If you just see a few static bubbles from the initial spray, that is nothing. If you see a tiny volcano forming, you have found your culprit.

Hunt for the Growing Foam
Start with the tread. Spray a generous layer across the entire surface you can see. If you do not see anything immediately, do not move on just yet. Sometimes a slow leak takes thirty seconds to push enough air out to create a bubble. While you wait, check the sidewalls for any gouges or cracks. If you recently had a car service checklist checkup, they might have missed a tiny puncture that only opens up when the weight of the car is at a specific angle.
Don’t forget the valve stem. This is the forgotten leak point. Spray the tip where the cap goes and the base where the rubber meets the rim. If your valve core is loose, you will see a single bubble form right in the center. It is a common issue, even if you follow the truth about nitrogen in your tires religiously. A leaking valve is often easier to fix than a puncture—sometimes it just needs a quarter-turn with a tool.
Check the Ground Side Every Time
The biggest mistake people make is only checking the top 75% of the tire. The nail is almost always hiding in the contact patch—the part currently touching the pavement. You have to roll the car forward or backward about two feet to expose that hidden section. I remember a freezing February morning where I checked three tires twice, only to find the screw tucked perfectly into the tread block that was pressed against the concrete. It was like the tire was actively hiding its wound from me.
As you spray, keep an eye out for other fluids too. While you are down there, knowing how to spot a leaking brake caliper before it fails can save you a lot of grief. If the liquid you see is oily rather than sudsy, your problem might be bigger than a flat tire. But if it is just bubbles, you are on the home stretch of the diagnosis.
Finding that tire leak is a win, but it is just the tip of the iceberg when it comes to keeping a car on the road without going broke. Let’s dig deeper into the nuances of maintenance that most people miss. Most drivers still believe a tune-up is simply about swapping out spark plugs and calling it a day, but in my experience, that is outdated thinking. In the age of fuel injection, maximizing your car’s lifespan with expert tune-up strategies is more about managing the electronics and airflow than just the hardware. I once saw a friend spend $400 on new ignition coils when the real culprit was a layer of dust on his sensors. This is a common trap: assuming the computer code always points to a broken mechanical part. Often, the computer is just reporting the symptoms of bad data. For example, the hidden benefit of cleaning your mass air flow sensor is that it can restore lost power and smooth out a rough idle for the price of a single cleaning spray, yet people replace the whole unit instead.
Can a simple sensor cleaning beat a $500 repair bill?
Quite often, yes. The National Institute for Automotive Service Excellence (ASE) emphasizes that proper diagnostics are the most critical part of any service, yet the ‘part-cannon’ approach remains the biggest mistake DIYers and even some shops make. They fire new parts at the car hoping to hit the problem, which is why learning how to tell if your computer is giving you a false error code is the most valuable skill you can develop. It saves you from the ‘Oops’ factor of buying a new catalytic converter when you really just had a $20 vacuum leak.

Why new brakes still squeak every morning
Another area where the ‘obvious’ fix fails is brake service. People think that if they buy the most expensive ceramic pads, their car will stop like a race car and stay silent. But here is the contrarian truth: the pads matter less than the preparation. If you reuse old, rusty hardware or ignore the simple way to bed in new brake pads, your brakes will eventually glaze and howl. This is one of the most persistent brake service myths—the idea that you can just bolt them on and drive normally. Without that initial heat-cycle to transfer a layer of pad material to the rotor, you will be left wondering why your brake pedal squeaks every morning. Have you ever fallen into this trap of replacing parts only to have the same annoying noise return a week later? Let me know in the comments, because we have all been there at least once.
I’ve learned the hard way that a $20 tool can save you $2,000 in labor. If you’re tired of playing the guessing game, you need to invest in a decent bidirectional OBD-II scanner. Most people buy the $15 Bluetooth dongles that just clear codes, but a real diagnostic tool lets you perform “active tests”—like forcing your fuel pump to turn on or checking individual wheel speed sensors. This level of detail is exactly how you figure out how to tell if your computer is giving you a false error code before you start tearing the dashboard apart and replacing parts that aren’t actually broken.
How do I keep my car from eating through parts?
The secret isn’t just buying the most expensive aftermarket brands; it is actually about managing your fluids. We often ignore brake fluid until the pedal feels like a wet sponge, but that moisture-loving liquid is slowly corroding your metal lines from the inside out. When you’re understanding brake system repairs a guide for vehicle owners, remember that old, contaminated fluid is the leading cause of internal hydraulic failure. If you skip the flush, you will eventually be wondering how to tell if your master cylinder is failing internally. A simple $10 copper strip test or an optical refractometer can tell you exactly when the chemistry has turned sour, preventing a cascade of expensive component failures before they even start. 
Don’t get left behind by 2025 tech
Looking ahead at auto repair trends to watch in 2025, we are seeing a massive shift toward software-defined vehicles. You won’t just be checking your oil; you will be checking firmware versions. As noted in the Delphi Technologies Technical Manual, the integration of ADAS (Advanced Driver Assistance Systems) means that even a simple brake job or wheel alignment might soon require a digital sensor recalibration to keep the safety systems functional. If you’re planning to maximize your car’s lifespan with expert tune-up strategies, you need to get comfortable with the idea that your vehicle is essentially a rolling data center.
Take the high-mileage challenge
If you really want to stay ahead of the curve, follow the ultimate car service guide and commit to one “deep” diagnostic inspection every six months. My favorite pro tip? Use a thermal imaging camera—you can get affordable attachments for your smartphone now—to look at your brakes after a long drive. If one rotor is significantly hotter than the others, you have found a sticking caliper before it ruins your gas mileage or warps your rotors. Go grab a bidirectional scanner this weekend and see what your car is actually trying to tell you—you might be surprised what is hiding behind that “all clear” dashboard.
The Hardest Lesson I Learned Beneath the Chassis
Over the years, I have realized that the most expensive tool in your garage is actually your own ego. I used to think I could outsmart a modern ECU by just “listening” to the engine, but that is how I ended up over-tightening bolts and snapping studs. Here are the core truths I live by now:
- Cleanliness is a diagnostic tool: Before you start any auto repair, wipe down the area. It is impossible to see fresh fluid on a layer of ten-year-old grime.
- Keep a paper trail: Following a car service checklist isn’t just for shops; it helps you track how fast your pads are wearing or if your fuel economy is dipping.
- Respect the torque specs: Especially when understanding brake system repairs a guide for vehicle owners, “tight enough” is never actually enough. Over-torquing leads to warped rotors and ruined hubs.
#IMAGE_PLACEHOLDER_E#
My Go-To Kit for Tackling Any Repair
If you are serious about skipping the dealership wait times, you need more than just a set of wrenches. These are the three things that changed the game for me. First, a high-quality torque wrench; it turns guesswork into science. Second, the official Factory Service Manual (FSM) for your specific VIN because it contains the electrical diagrams generic manuals miss. Finally, never underestimate the power of a smoke machine. While I mentioned using a spray bottle for tires, the simple way to check for vacuum leaks with smoke is the only way to find those invisible cracks in plastic intake manifolds that cause a rough idle.
Take the First Step Toward Mechanical Independence
Modern vehicles can be intimidating, especially with the digital shifts we are seeing in auto repair, but the fundamentals of a good tune up haven’t changed. Whether you are chasing a slow leak or trying to maximize your car’s lifespan with expert tune-up strategies, the goal is the same: stay ahead of the failure. Don’t wait for the dashboard to light up. By taking charge of your own car service and brake service, you aren’t just saving money—you are building a relationship with the machine that keeps your life moving. Have you ever spent hours searching for a “ghost” leak only to find it was something incredibly simple? Let me know your biggest DIY win in the comments below!