
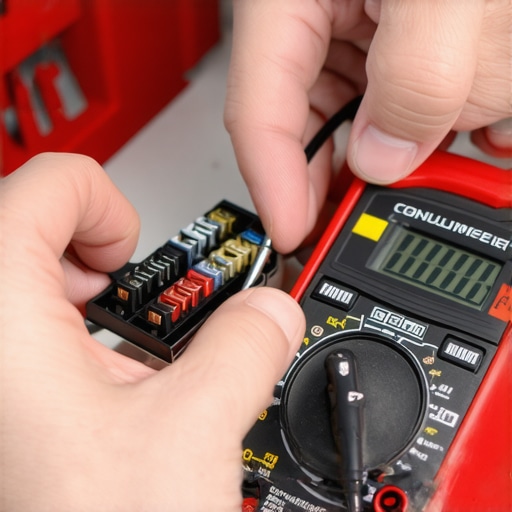
I’ll never forget the rainy Tuesday I sat on the side of the I-77, staring helplessly at my dashboard because my windshield wipers decided to quit in the middle of a downpour. I did what most people do: I started yanking every fuse I could find, hoping to see a broken wire. By the time I was done, I’d dropped a 15-amp fuse into the dark abyss of my floor vents and still hadn’t fixed a thing. That was my lightbulb moment. I realized that most of us are never taught the right way to handle these tiny plastic boxes of frustration. Whether you are troubleshooting common auto repair issues or just trying to get your radio to play music again, there’s a method to the madness that doesn’t involve scraped knuckles or lost parts. Today, I’m going to walk you through the exact process I use now to pinpoint a dead fuse in seconds, saving you from a pricey trip to the shop or a mental breakdown in a parking lot.
Stop Pulling Every Fuse in the Box
The biggest mistake I made—and maybe you’re doing it too—is the guess and check method. I used to think I could just eyeball every fuse to see if the metal bridge inside was broken. But here is the kicker: fuses can look perfectly fine and still be completely dead. This is especially true in modern cars where auto repair trends are making electrical systems more complex by the day. Sometimes a hairline fracture is all it takes to kill your power windows. It is frustrating. It is tedious. And honestly, it’s unnecessary. Most people assume that if the plastic isn’t charred, the fuse is good, but electricity is a fickle beast. Just like you might be cleaning a clogged windshield washer nozzle only to find the pump isn’t getting juice, you need a way to verify the path of the current without guesswork.
Is a cheap test light actually worth the hype?
You might be wondering if you really need to buy another tool for your glovebox. The answer is a resounding yes. While I once relied on how professional diagnostics found my ghost electrical leak for everything, a simple $10 test light is the secret weapon for any DIYer. It gives you instant feedback without having to remove the fuse at all. According to the National Institute for Automotive Service Excellence (ASE), electrical issues account for a significant percentage of vehicle malfunctions, and many of these are misdiagnosed simply because the technician (or the owner) didn’t properly test the circuit integrity. Have you ever spent an hour checking your brake service components only to realize a blown fuse was the real culprit behind a warning light? Drop a comment and tell me I’m not the only one who’s been there! Now, let’s get into the actual gear you’ll need to do this like a pro.
Look Under the Dash and the Hood First
Before you start poking around, you need to find the maps to the kingdom. Most modern vehicles hide their electrical brains in at least two places: under the driver’s side dashboard and near the battery in the engine bay. If you can’t find them, don’t panic. This is basic troubleshooting common auto repair issues that every owner should know. Usually, the plastic cover of the fuse box has a diagram printed on the inside. This diagram is your Rosetta Stone. It tells you exactly which fuse controls the radio, the fuel pump, or why your dashboard vents only blow air at the windshield. If that diagram is missing, your owner’s manual is the next best thing. Think of the fuse box like a house’s breaker panel; you wouldn’t start flipping random switches in the dark, and you shouldn’t do it here either.
Hook Up Your Ground the Right Way
This is where I messed up the first time I tried this. I was working on an old Nissan, and I clipped my test light’s alligator clip to a bolt I thought was metal, but it was actually painted. Because paint doesn’t conduct electricity, my light never turned on, and I spent twenty minutes convinced the car had suffered a catastrophic meltdown. To avoid my mistake, find a piece of bare, unpainted metal on the car’s frame or a large bolt that goes directly into the chassis. This is your ‘ground.’ Once you are clipped on, touch the tip of the test light to the positive terminal of the battery or a known ‘hot’ fuse just to verify the tool actually works. If it glows, you’re ready to hunt. This simple step is just as vital as knowing how to tell if a battery is just discharged or truly dead before you start replacing parts.
The Two-Tap Method to Find a Dud
Now for the secret sauce. Look at the top of a blade-style fuse. You’ll see two tiny metal dots exposed in the plastic. These are test points designed specifically so you don’t have to pull the fuse out. Turn your ignition to the ‘on’ position so the circuits are energized. Touch your test light tip to the first metal dot. If it lights up, move to the second dot. If the light glows on both sides, the fuse is healthy and the electricity is flowing through it like water through a clear pipe. However, if the light glows on one dot but stays dark on the other, the internal bridge is broken. You’ve found your culprit. If the light doesn’t glow on either side, that circuit might not have power yet—some things, like headlights, need to be turned on at the switch to send juice to the fuse. This systematic approach is the core of any tune up your car for peak performance strategy because it eliminates the ‘phantom’ problems that haunt DIYers.
Dealing with Those Stubborn Ghost Faults
Sometimes, you’ll find that every fuse is perfectly fine, yet your component still won’t work. This is the moment where many people give up and call a tow truck, but you can still go one step further. I remember a weekend where my headlights refused to pop up. Every fuse was perfect. It turned out to be a corroded ground wire buried deep in the fender. While how professional diagnostics found my ghost electrical leak might eventually be necessary for deep-seated wiring harness issues, the test light can still tell you if the ‘socket’ the fuse sits in is actually receiving power. If you pull the fuse and probe the two slots it sits in, one of them should light up. If neither does, the problem is further ‘upstream’ towards the battery or a relay. It is much like checking for a clog in a hose; if no water is even getting to the nozzle, you stop looking at the nozzle and start looking at the faucet.Most people assume that a standard car service is just a checklist of fluids and filters. But if you want to reach 200,000 miles, you have to look for the things the dealership usually ignores. Take the modern tune-up. Most shops will charge you a premium to swap spark plugs and call it a day. In my experience, a real tune up for peak performance involves checking the fuel trim data and looking for microscopic vacuum leaks that haven’t even triggered a check engine light yet. Everyone says to wait for the dashboard light, but by the time that amber glow appears, you’ve likely been wasting fuel and stressing your catalytic converter for months.
The fatal mistake of up-sizing your fuses
One of the biggest traps I see beginners fall into is the amperage upgrade. You find a blown 10-amp fuse for your radio or accessory port, and because you’re tired of it popping, you shove a 20-amp fuse in there. Stop right there. Fuses are designed to be the weakest link in the chain to protect your expensive wiring harness. If you up the amperage, you aren’t fixing the problem; you’re just turning your wiring into a heating element. According to the Society of Automotive Engineers (SAE), the majority of vehicle fires that originate in the electrical system are caused by bypassed or improperly rated circuit protection. This isn’t just scheduled maintenance; it is a safety hazard that can melt your dashboard from the inside out.
Why does your multimeter show 12 volts but nothing works?
This is the ultimate nuance that separates the pros from the parts-changers. You might put a multimeter on a wire and see a perfect 12.6 volts, leading you to believe the circuit is healthy. But here’s the kicker: voltage is not the same as current. A single strand of corroded copper wire can carry a 12-volt signal, but it won’t have the muscle to actually turn a motor or light a high-draw bulb. This is known as a voltage drop under load. It’s why you might find your sensors acting up despite good power readings—sometimes the ground side of the circuit is so corroded it acts like a bottleneck. When you’re diving into expert tune up strategies, you have to stop thinking about wires as simple pipes. They are dynamic components. I once spent three days chasing a radio issue that turned out to be a slightly loose lug nut on the main grounding block—the same kind of mechanical oversight that leads to rotor warping when people get sloppy with their wheels. Have you ever fallen into this trap where a simple fix turned into a week-long mystery? Let me know in the comments, I’d love to hear your ghost in the machine stories!That grounding issue taught me that while hand tools are most of the battle, you eventually need to upgrade your diagnostic arsenal if you want to stop guessing and start knowing. If you’re serious about a comprehensive car service, your next investment shouldn’t be a bigger wrench, but a digital brain. I’m talking about a high-quality Bluetooth OBD2 scanner. I personally use one because it lets me see ‘Fuel Trims’ and ‘Oxygen Sensor’ voltages in real-time on my phone while I’m driving. This is the difference between a basic repair and expert tune up strategies that catch a failing catalytic converter before it leaves you stranded. According to the Bosch Automotive Handbook (10th Edition), a parasitic draw on a standard 12V system should ideally stay below 50 milliamps when the car is ‘asleep.’ If yours is higher, you aren’t just looking at a bad battery; you have a circuit that’s staying awake and eating your profits. Integrating this kind of data into your car service checklist transforms you from a part-changer into a diagnostic pro.
Why Your Toolbox Needs a Digital Brain
The days of adjusting a carburetor by ear are long gone. Today, we have to speak the car’s language. I remember helping a neighbor who was convinced they needed a full brake service because of a weird vibration. After plugging in my scanner, we saw a misfire code that only triggered under load—it wasn’t the brakes at all; it was a dying ignition coil. This is why how regular tune ups improve fuel efficiency isn’t just marketing speak; it’s about using data to find the 1% inefficiencies that add up to hundreds of dollars at the pump. If you aren’t looking at your live data, you’re just throwing parts at a ghost.
How do I maintain my car’s complex electronics over time?
Keeping electronics happy is mostly about fighting the silent killer: corrosion. Most people ignore why your car battery terminal keeps getting corroded, but that white crust is actually an acid vapor leak that can travel up the wires and ruin your ECU. I make it a habit to apply a thin layer of dielectric grease to every electrical connector I touch. It seals out moisture and prevents the ‘green death’ that eats copper pins. As we look at auto repair trends to watch in 2025, we’re seeing a shift toward ‘Software-Defined Vehicles’ where a glitch in your infotainment can actually prevent the car from shifting gears. In the near future, I predict we will see AI-integrated consumer scanners that don’t just give you a code, but actually analyze the sound of your engine through your phone’s microphone to predict bearing failure before it happens. This level of preventative tune up for peak performance is becoming the new standard for DIYers who want to hit that 300,000-mile mark. If you really want to level up today, grab a cheap Bluetooth scanner and look at your Long Term Fuel Trim (LTFT). If it’s more than 10% positive, you have a vacuum leak you haven’t found yet—go find it!
Lessons from a Blown ECU and the $10 Tool That Could Have Saved It
After years of turning wrenches, I’ve realized that electrical work is 90% logic and 10% actually touching wires. One of the biggest ‘lightbulb moments’ for me was realizing that a fuse isn’t just a part; it’s a messenger. If a fuse blows, it’s telling you the circuit is under stress. If you replace it and it pops again, stop—you have a short. Another hard-earned lesson? Don’t trust your eyes. I’ve seen fuses that looked factory-fresh but had internal fractures only a test light could detect. This is where how professional diagnostics found my ghost electrical leak really opened my eyes to how sneaky these issues can be. Finally, remember that heat is your enemy. If a fuse or a wire feels hot to the touch, you have high resistance, usually from corrosion at the base.
Build a Diagnostic Kit That Actually Works
You don’t need a $5,000 professional scanner to be effective. For a solid car service checklist, start with a basic incandescent test light—it’s more reliable for checking power than many digital meters. Next, grab a tube of dielectric grease; using it on connectors is one of the best expert tune up strategies to prevent the ‘green death’ of corrosion. I also highly recommend a Bluetooth OBD2 dongle. It turns your phone into a live data monitor, which is essential for a modern tune up for peak performance. Finally, download a PDF of your car’s specific wiring diagram—it’s the map that prevents you from getting lost in the harness.#IMAGE_PLACEHOLDER_E#
Mastering the Invisible Side of Car Maintenance
Electrical issues used to be the one thing that made me want to sell a car. But once you understand the flow of current, you stop being a victim of ‘ghost’ problems. Taking the time to learn these basics is what allows you to hit 200,000 miles without a permanent check engine light. Whether you are performing a routine car service or hunting down a mystery drain, keep your head cool and your test light grounded. You’ve got this! Have you ever replaced a fuse only for it to pop again five minutes later? Tell me your electrical horror stories in the comments below!