

I remember the night I almost had a heart attack because of a bedroom door. It was 2 AM, and I was creeping toward the nursery to check on my sleeping newborn. I pushed the door just an inch, and SCREEEE—it sounded like a rusty gate in a haunted house. The baby woke up, my wife woke up, and I stood there in the dark feeling like a failure. That was the moment I realized my previous ‘quick fix’ was a total joke. We often ignore these tiny annoyances until they ruin a perfectly good moment. It is a lot like how we ignore a tiny rattle in the driveway until we are suddenly troubleshooting common auto repair issues on the side of the road. I am here to tell you that you do not have to live with that high-pitched scream every time you walk into a room.
That Midnight Screech is Driving You Crazy
The truth is, most of us reach for the wrong tool the second we hear a hinge groan. I used to be the guy who thought a quick squirt of whatever was in the garage would do the trick. Early on, I made the classic mistake of using vegetable oil from the kitchen. It worked for three days, then it turned into a sticky, black sludge that smelled like old fries and actually made the squeak worse. It was a mess. If you have ever felt that frustration, you are not alone. It is the same feeling you get when you realize your squeaky seat is driving you crazy during a long commute. Metal-on-metal friction is a persistent enemy. According to structural engineering experts at the Steel Construction Institute, unlubricated metal joints can experience galling, where the surfaces actually tear and weld themselves together at a microscopic level. This is why a simple spray is rarely enough. Today, I am going to show you how to move past the temporary band-aids and fix the problem at the source. We are talking about a permanent silence that lasts years, not weeks.
Is fixing this once and for all even possible?
You might be skeptical because you have probably tried the ‘spray and pray’ method a dozen times. You think your hinges are just old or warped. Most of the time, they are just starved for the right kind of attention. Just as you would not skip understanding brake system repairs when your car starts acting up, you should not ignore the mechanical needs of your home. We are going to dive into the specific lubricants that actually bond to the metal rather than just sitting on top of it. I want to hear from you first, though—have you ever had a noisy door completely ruin a stealthy midnight snack run or wake up a sleeping guest? It is a rite of passage for every homeowner, but it is one we are ending today. Put down the cooking spray and let’s get into the real solution.
Stop Spraying and Start Stripping
To fix a squeak forever, you have to realize that the noise is coming from the center of the hinge, not the outside. Sprays like WD-40 are basically the ‘Fix-a-Flat’ of the home world; they are great for an emergency, but you shouldn’t rely on them for the long haul. Just as you wouldn’t skip understanding brake system repairs when your car is grinding, you shouldn’t ignore the internal mechanics of your door. You need to get to the hinge pin to apply a solution that lasts. When metal-on-metal friction reaches that high-pitched scream, it means the protective layer of oil has been replaced by a layer of oxidized debris. You cannot simply ‘add’ more lubricant to that mess; you have to remove the friction point entirely.
Pull the Pin Without Destroying Your Paint
I learned this the hard way during a renovation in our first apartment. I tried to pry a pin out with a flathead screwdriver and a kitchen hammer. I slipped, gouged a deep white scar into the mahogany trim, and still didn’t get the pin out. Use a nail set or a dedicated hinge pin tool. Place it at the bottom of the hinge and tap upward gently with a mallet. This is the ‘pre-service’ phase, similar to how you’d prepare for a fix for grinding brakes without replacing rotors. Once that pin pops up an inch, you can usually pull it the rest of the way by hand. If it is stuck, it is likely because of the same oxidation and heat-bind that causes a noisy lifter to tick in an old engine. Gently wiggle the door to take the weight off the hinge while you pull.
Scrub Away a Decade of Hidden Grime
Once the pin is out, look at it. If it is black, sticky, or covered in what looks like dried sap, that is your culprit. That is ‘gunk’—a technical term for old oil mixed with household dust and microscopic metal shavings. 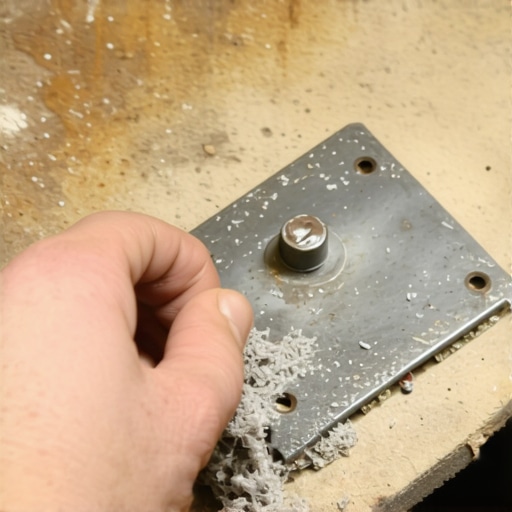 Take a piece of fine steel wool or a Scotch-Brite pad and buff that pin until it shines like a new dime. You want a smooth, mirror-like surface. When I finally pulled the pin on that nursery door I mentioned, it was covered in a thick, black sludge that looked like it belonged in a crankcase. That is the result of ‘the spray cycle’—people keep spraying liquid oil, it catches dust, turns to gunk, and the friction increases. It is the same logic behind why regular tune-ups improve fuel efficiency and safety; you have to clear out the old debris to let the machine work as intended. By scrubbing that pin down to the bare metal, you are resetting the mechanical clock of that hinge.
Apply the Lubricant That Bonds to Metal
Now, here is where most people fail. You want a ‘dry’ lubricant or a high-viscosity grease that won’t run off or evaporate. White lithium grease is my go-to because it stays exactly where you put it. It is a lot like the specialized lubricants used when you silence a noisy compressor without replacing it. Apply a very thin, even coat to the pin using a rag. Don’t glob it on; if it is dripping, you have used too much. Follow your car service checklist mindset: precision is better than volume. Drop the pin back into the hinge, tap it down, and swing the door back and forth twenty times to distribute the grease. The silence will be immediate, and because you used a stable grease, it won’t attract the dust that creates the next squeak.Just like the door hinge I struggled with, your car’s mechanical health depends on moving past the surface-level fixes and looking at the chemistry involved. The biggest lie currently circulating in the automotive world is the concept of ‘lifetime fluids.’ Many manufacturers now claim that transmission fluid or differential oil never needs to be changed. In my experience, this is a marketing tactic designed to lower the ‘cost of ownership’ for the first three years, but it is a death sentence for your vehicle at year seven. If you actually want to maximize your cars lifespan with expert tune-up strategies, you have to ignore the ‘lifetime’ label. Heat and friction eventually break down the molecular structure of any lubricant, turning it into the same kind of sludge that froze my nursery door. Understanding the real difference between a transmission flush and a drain and fill is the difference between a healthy gearbox and a five-thousand-dollar replacement bill. 
The ‘Lifetime Fluid’ Myth is Killing Your Transmission
When metal components rub together, they create microscopic shavings. Without regular fluid changes, these shavings circulate through your system like liquid sandpaper. I’ve seen ‘sealed’ transmissions fail at 120,000 miles because the owner believed the manual. A study by the Car Care Council found that over 80% of vehicles on the road are in need of at least one service or repair, often due to neglected fluids. It is the ultimate ‘oops’ factor: trusting the manufacturer’s marketing over basic mechanical physics. Before you head to the shop, make sure you are learning brake service myths so you don’t fall for the next marketing gimmick.
Why does your oil look black after only 500 miles?
This is a question I get from people who are just starting to take their maintenance seriously. In modern Gasoline Direct Injection (GDI) engines, soot is a common byproduct of combustion. According to experts at SAE International, high-detergency modern oils are specifically engineered to suspend these carbon particles to keep them from forming deposits on your valves. Black oil isn’t necessarily ‘bad’ oil, but it is an indicator of how hard your engine is working. However, don’t let that be an excuse to follow the truth about 10000 mile oil change intervals blindly. If you do a lot of stop-and-go driving, your oil never reaches the temperature required to burn off moisture and fuel dilution, meaning you need to change it far more often than the dashboard light suggests.
Don’t Skip the Bedding Process for New Brakes
The most common mistake I see DIYers make is the ‘slap and go.’ You spend the afternoon replacing your pads, you tighten the bolts, and you immediately drive to work. This is a massive error. You must ‘bed-in’ your brakes to transfer an even layer of pad material onto the rotor. If you don’t, you’ll experience a pulsing pedal or high-pitched squealing within a month. This is often the real reason your new brake pads are smoking during the first few miles; it’s the resins in the pads curing under heat. Following the proper way to break in new brake pads and rotors ensures the friction is consistent and silent. Have you ever fallen into the ‘lifetime fluid’ trap or had a shop tell you a part didn’t need service only to have it fail later? Let me know in the comments; I’d love to hear your horror stories.
Why Your $20 Scanner is Actually Lying to You
I see it every day in the DIY forums: someone buys a generic, pocket-sized OBD-II reader and thinks they have a crystal ball. These basic tools are great for reading general codes, but they often lack the bi-directional control needed to actually test components. If you want to move past simple guesswork, you need a tool that lets you command the vehicle’s computer to cycle a fuel pump or engage an ABS solenoid. I personally use a mid-tier tablet-based scanner because it provides live data graphing. Seeing a fuel trim spike in real-time tells a story that a static code never could. Technical documentation from the Society of Automotive Engineers (SAE) points out that over-torquing a single lug nut can distort the brake rotor by as much as 0.003 inches, which is enough to cause significant vibration under load. This level of precision is why I stopped ‘feeling’ my way through repairs and started using specialized equipment. You cannot accurately perform essential maintenance tips if you are relying on cheap, uncalibrated tools.
Ditch the Guesswork with a Digital Micrometer
When most people think their brakes are warped, they are usually just suffering from uneven pad deposit or slight run-out. I never pull a rotor anymore without checking it with a digital micrometer first. This tool allows you to measure the thickness of the disc at multiple points to see if it is within the manufacturer’s spec. If you are troubleshooting common auto repair issues by simply throwing parts at the car, you are burning money. I use the micrometer because it gives me a binary answer: the rotor is either thick enough to resurface or it belongs in the scrap bin. 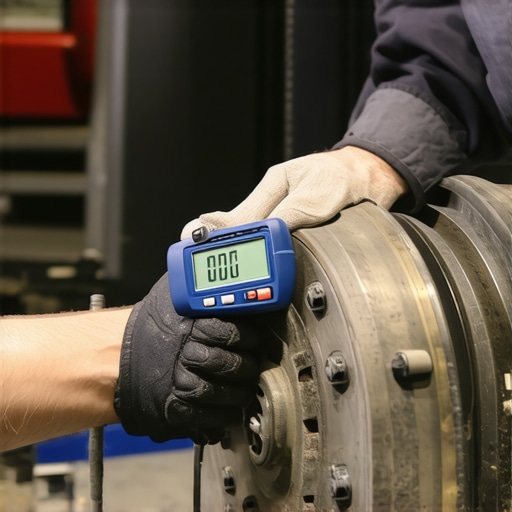 It is the same logic I apply when determining if a master cylinder is failing internally. Without hard measurements, you are just a parts-swapper, not a mechanic. Precision tools turn a weekend headache into a surgical procedure.
How do I maintain mechanical precision over the long haul?
Maintenance isn’t just about what you do to the car; it is about how you care for the tools that service the car. I keep my torque wrenches in a climate-controlled space and always dial them back to zero after use to keep the internal springs from losing their calibration. To keep your vehicle in top shape, you must follow an ultimate car service guide that emphasizes cleanliness. Every time I open a brake line, I use a vacuum bleeder rather than the old ‘pump the pedal’ method. Why? Because the vacuum method ensures no moisture-heavy air is introduced into the system, protecting the sensitive valves inside your ABS module. This attention to detail is how you maximize your cars lifespan with expert tune-up strategies that actually work.
Where the Wrench Meets the Cloud
I predict that within the next five years, the ‘grease monkey’ era will be completely overshadowed by remote diagnostics. We are already seeing trends to watch in 2025 where cars transmit health reports directly to the manufacturer via 5G. This means the car will tell you it has a vacuum leak before you even feel the engine stumble. However, the physical work—knowing how to torque wheel bolts correctly—will always require a human touch. Try this: The next time you change your oil, take a small sample and send it to a lab like Blackstone for analysis. It costs about $30, but the data on wear metals in your oil will tell you exactly how much life your engine has left. It is the ultimate advanced tip for the serious owner.
Hard Lessons from the Bottom of a Grease Pit
Over the years, I have learned that the loudest part of a machine usually indicates the cheapest fix, provided you act before the noise stops. When I first started doing my own car service, I thought a can of spray lubricant was a magic wand. I was wrong. The hardest lesson I ever learned was that cleanliness is actually a form of lubrication. A clean, dry hinge pin is better than a dirty, oiled one every single time. Secondly, never trust a ‘sealed for life’ component; physics does not care about marketing brochures. If a part moves, it generates heat, and heat eventually wins unless you intervene.
Another lightbulb moment came when I realized that my torque wrench was my most important safety tool. Most beginners strip threads because they want to feel the bolt ‘bite,’ but by the time you feel it, the metal has already stretched beyond its limits. Following a car service checklist helps you slow down and treat each bolt with the respect it deserves. Finally, always listen to the ‘ghost’ sounds—those tiny clicks that only happen when you turn left or hit a specific speed. They are the early warning signs of an auto repair that could cost you thousands if ignored.
The Gear That Actually Earned a Spot in My Toolbox
I do not believe in buying every gadget on the shelf, but there are four things I will never work without. First is a high-quality digital micrometer; it removes the ‘I think’ from brake work by giving you hard numbers on rotor wear. Second, I swear by white lithium grease in a tube—not the spray—because it stays put for years without attracting road grime. Third, I highly recommend ‘The Complete Guide to Automotive Mechanics’ by James Halderman; it is the industry bible for anyone wanting to maximize your cars lifespan with expert tune-up strategies. Lastly, a simple magnetic retrieval tool has saved me more times than I can count when a bolt drops into the abyss of the engine bay.
#IMAGE_PLACEHOLDER_A#
Reclaiming the Quiet Confidence of a Well-Oiled Machine
You do not need to be a certified technician to take control of your vehicle’s health. Whether it is silencing a door hinge or debunking common brake service myths, the power lies in your willingness to look past the surface and understand the mechanics involved. When you tune-up your car for peak performance, you are not just saving money; you are building a relationship with the machine that carries your family every day. Start small, use the right tools, and never settle for a temporary fix when a permanent one is within reach.
Have you ever found a ‘lifetime’ part that actually lived up to the name, or did it fail right when the warranty expired? Let me know your experiences in the comments below.