
I will never forget the cold November night my old truck decided to give me a heart attack. There I was, cruising down a backroad, when that dreaded little red oil can symbol started flickering like a haunted Christmas light. My stomach dropped. In the world of auto repair, that light usually means your engine is seconds away from becoming an expensive paperweight. I pulled over, hands shaking, and pulled the dipstick. To my shock, the oil level was perfect. That was the first time I realized that sometimes, your car is just a big, expensive liar.
Stop Panicking and Start Testing Your Sensor
We have all been there—staring at the dashboard in a cold sweat. But here is the thing: sensors are just pieces of plastic and wire, and they fail far more often than the heavy-duty metal parts of your engine. When you are troubleshooting common auto repair issues before visiting the shop, the sensor should always be your first suspect, not your last. I learned this the hard way early in my DIY journey when I spent an entire weekend—and a few hundred dollars—replacing a perfectly good oil pump because I assumed the gauge was gospel. Talk about a blow to the ego. Today, we are going to walk through how to tell if your engine is truly starving for oil or if you just have a sensor that has gone rogue. It is about saving your sanity and your wallet. Have you ever had a dashboard light lie to your face? Drop a comment below; I want to hear about the most stressful “false alarm” your car ever threw at you.
Is a Ghost Light Really Worth the Stress?
You might be thinking that if the light is on, you should just fix it immediately. Not always. Sometimes, electrical gremlins or even why your engine oil level is increasing on the dipstick can mess with the readings. According to the automotive experts at Car and Driver, electrical sensor failures are among the most common reasons for warning light illuminations in modern vehicles. It is a classic case of the boy who cried wolf, but when the wolf is a $5,000 engine rebuild, you cannot afford to ignore it—or to misdiagnose it. Before you dive into the ultimate car service guide, you need to know the physical signs of low pressure. If your engine is not knocking or ticking like a grandfather clock, there is a high probability that the metal-on-metal contact has not started yet. We will also look at whether you have been fooled by the truth about high mileage oil additives or if your sensor is simply gummed up with sludge. Let us get into the nitty-gritty of how to verify the truth with a manual gauge.
Ditch the Electronics and Go Analog
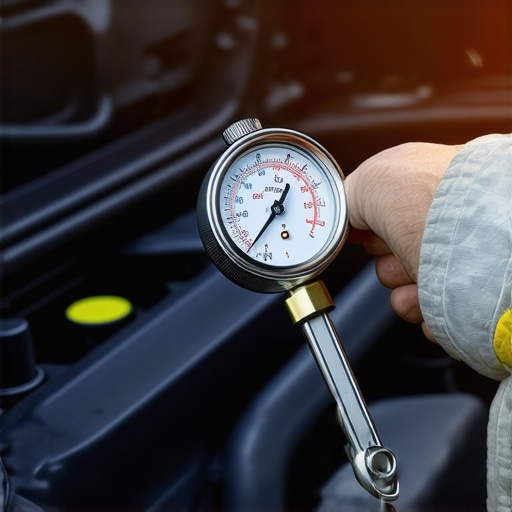
To find out if your engine is really in trouble, you have to bypass the car’s computer and get a direct reading from the source. Think of your dashboard light like a game of telephone; the sensor hears the pressure, tells the computer, and the computer tells you. Somewhere in that chain, the message usually gets garbled. To get the truth, you need a mechanical oil pressure test kit. I remember helping a neighbor with his old sedan that was throwing a low-pressure code. He was convinced the engine was toast. We unscrewed his sensor, which looked like it had been dipped in tar, and hooked up a manual gauge. The second we fired it up, the needle jumped to a healthy 40 PSI. It turned out his extended 10,000-mile oil change intervals had allowed just enough sludge to build up and choke the sensor’s tiny inlet hole. Before you assume the worst, verify the physical reality of your engine oil flow.
Hooking Up Your Mechanical Truth-Teller
First, locate your oil pressure sending unit. It is usually a small, cylindrical plug with one or two wires coming out of it, screwed directly into the engine block or the oil filter housing. You will need to unplug the electrical connector and use a deep socket to remove the sensor. This is where things can get a bit messy, so keep some shop rags handy. Once the sensor is out, find the matching adapter from your test kit and screw the manual gauge hose into that same hole. As you work through your car service checklist, this is arguably the most critical diagnostic step for high-mileage engines. Hand-tighten the adapter first to ensure you do not cross-thread the block, then snug it down with a wrench. You do not need to torque it into oblivion; you just need a seal that can hold back the pressure for a few minutes of testing.
Watch the Needle Dance
Now comes the moment of truth. Start the engine and watch the gauge immediately. On a cold start, your pressure should be high—often between 40 and 60 PSI depending on the vehicle. As the oil warms up and thins out, that pressure will naturally drop. If your manual gauge shows a steady, healthy pressure while your dashboard is still screaming at you, then you have 100% confirmed a failed sensor or a wiring issue. However, if the manual gauge stays stubbornly low, you might be dealing with a worn oil pump or internal bearing wear. This is often accompanied by a distinct tapping sound, and knowing how to quiet a noisy lifter without tearing down the engine can sometimes buy you time, but it won’t fix a dying pump. When you tune up your car for peak performance, verifying these base mechanical numbers ensures you aren’t just putting a fresh coat of paint on a crumbling house. Check the pressure at idle and then again at 2,500 RPM to see if it scales up properly as the engine speeds up.
Let’s dig deeper into the stuff the dealership service department doesn’t always want to explain to you. There is a common belief that your owner’s manual is the definitive, unchangeable guide to your car’s soul. In reality, modern manuals are often written by or for marketing teams who want to advertise a low ‘Total Cost of Ownership’ to initial buyers. This is how we ended up with the dangerous myth of ‘lifetime’ transmission fluid. In my years under the hood, I’ve seen more transmissions killed by ‘lifetime’ fluid than by actual mechanical defects. Heat is a universal solvent; it degrades every chemical bond eventually. To truly save your transmission from heat damage, you have to look past the marketing. The real difference between a transmission flush and a drain and fill is that one is a gentle refresh while the other can sometimes dislodge settled gunk that clogs up tiny valve body passages in high-mileage cars. If you have over 100,000 miles and have never touched the fluid, a high-pressure flush is a trap you want to avoid.
Your New Brake Pads Are Smoking for a Surprising Reason
Then there is the brake job nuance. I cannot tell you how many panicked calls I get from friends saying, ‘I just did my brakes and they are smoking!’ Do not lose your cool just yet. Usually, the real reason your new brake pads are smoking is just the curing process of the resins or a protective oil coating on the rotors that was not fully cleaned off during installation. However, the ‘oops’ factor here is failing to follow the proper way to break in new brake pads and rotors. If you do not ‘bed’ them in—transferring a thin layer of friction material to the rotor—you will end up with a pulsating pedal that feels like a warped rotor, even though the metal is perfectly straight. This is a nuance many DIYers skip, leading to premature component failure and a lot of frustration.
Why is the Brake Pedal Still Soft After You Bled the Lines?
This is where the seasoned mechanics get separated from the beginners. You have bled the lines three times, no air bubbles are coming out, but the pedal still sinks toward the floorboards. Most people assume there is air trapped in the ABS module, but the hidden nuance is often internal leakage. When you learn how to tell if your master cylinder is failing internally, you realize that the seals can let fluid bypass the piston without ever leaking a drop on the ground. It is a ghost leak. You might also be hunting the fix for a soft brake pedal that mechanics keep missing, which is often a bulging rubber brake hose that expands under pressure like a balloon rather than pushing the caliper. According to the automotive experts at the Car Care Council, neglected brake fluid is one of the top causes of internal system corrosion, leading to these very failures. If your brake fluid looks like coffee creamer, you are already behind the curve. To maximize your cars lifespan with expert tune-up strategies, you have to treat fluids as the lifeblood they are, not just something you check when a warning light comes on. Have you ever fallen into this ‘lifetime fluid’ or ‘ghost leak’ trap? Let me know in the comments; I have seen it all, and I promise you are not the only one.
Stop Guessing and Get a Real Scanner
Maintaining your vehicle in the modern era is no longer just about having a good set of wrenches and a bucket for oil. If you want to keep your car out of the dealership’s expensive clutches, you need a bidirectional OBDII scanner. I personally transitioned from a cheap $20 code reader to a professional-grade tablet scanner because of one specific reason: electronic parking brakes. On almost every modern SUV, you cannot complete basic brake system repairs without using a tool to retract the electronic calipers into ‘service mode.’ Trying to force them back with a C-clamp is a $600 mistake just waiting to happen. This is how auto repair trends to watch in 2025 are shifting; the digital side of the car is becoming just as critical as the mechanical side.
How do I maintain my car’s peak performance over 200,000 miles?
The secret isn’t a magic potion you pour into the fuel tank; it is the discipline of ‘service-life’ management. Most people wait for a part to fail before they act, but the secret to getting 200,000 miles out of your original engine is replacing high-wear items like the water pump or timing belt before the manufacturer’s deadline. When you follow the ultimate car service guide, you are paying for reliability, not just a fix. I also insist on using a calibrated torque wrench for every single bolt, from the oil pan drain plug to the lug nuts. Following the proper way to torque wheel bolts without a manual ensures you don’t create uneven pressure on the rotors, which is the hidden culprit behind that annoying brake pulsation. As highlighted in technical documentation from SAE International regarding fastener tensioning, over-torquing is just as dangerous as under-torquing because it stretches the bolt beyond its ‘elastic limit,’ meaning it will never hold the same way again.
The Era of Predictive Maintenance is Here
Looking ahead, the next big shift in auto repair is going to be telematics and predictive data. We are moving toward a world where your car will email you a health report before a light even appears on the dash. In the meantime, staying on top of things like how regular tune-ups improve fuel efficiency and safety is your best defense against rising fuel prices. When you tune up your car for peak performance, you aren’t just changing spark plugs; you are ensuring the air-fuel ratio is optimized to prevent carbon buildup. I strongly recommend checking your own long-term fuel trims with a scanner once a month. If you see a number higher than 10%, you have a vacuum leak or a failing sensor that hasn’t triggered a light yet. Catching that early is the difference between a $15 vacuum hose and a $1,200 catalytic converter replacement. If you have an OBDII scanner, go out today and check your ‘Live Data’ for ‘Long Term Fuel Trim’—if it’s in the double digits, start hunting for a leak before it costs you a fortune at the pump.
The Hardest Lesson I Learned About Chasing Ghost Lights
After decades of turning wrenches, I’ve realized that the most expensive part of any repair isn’t the component itself—it’s the time wasted on a bad diagnosis. My biggest “lightbulb moment” came when I stopped trusting the dashboard and started trusting physical evidence. One thing I’ve learned is that car service isn’t just about changing parts; it’s about understanding the “why” behind the failure. I’ve seen too many people fall for brake service myths that lead to unnecessary rotor replacements when a simple cleaning would have sufficed. Always remember: the cleanest engine in the world can still fail if the electrical connections are corroded. Take five minutes to scrub those terminals before you buy a new alternator or sensor.
Gear That Actually Earned a Spot in My Garage
You don’t need a professional shop to do professional work, but you do need tools that don’t lie to you. Here are the resources I swear by for any deep auto repair project:
- A Calibrated Torque Wrench: This is non-negotiable. I’ve seen too many DIYers strip threads or cause leaks because they thought they had “calibrated hands.”
- A Vacuum Gauge or a Cigar: Seriously, learning how to identify a vacuum leak using a simple cigar is a classic trick that works better than some $200 machines.
- Quality Shop Manuals: Digital guides are great, but having a physical Haynes or Chilton manual allows you to keep the grease off your phone while you verify specific torque specs and wiring diagrams.
#IMAGE_PLACEHOLDER_E#
Master Your Machine and Drive with Confidence
Taking the leap from “driver” to “mechanic” is about more than just saving money; it’s about the peace of mind that comes from knowing exactly what is happening under your hood. Whether you are learning how to revive dim dashboard lights without a professional or tackling a full suspension overhaul, the key is to stay curious and keep testing. Don’t let a flickering light or a noisy engine intimidate you. You have the tools and the knowledge to find the truth behind every “ghost light” your car throws at you. Every successful tune up you complete makes you a more capable, informed owner. Have you ever spent a whole weekend replacing a major part only to find out it was just a loose wire or a $5 sensor? I want to hear your most frustrating “false alarm” stories in the comments below!